We recently welcomed home our little gal Juniper. I've been VERY slowly working through decorating her space. The slow pace has allowed me to be selective with what I bring into the room.
From the beginning, I've had a few DIY's in mind. This simple mobile was taking up space in my brain for quite some time. I believe the handmade quality of the project (a simple stitch along with raw edges of fabric) works well for a beginning sewing project. It can also be completely customized for your own spaces by changing out yarn colors, fabric choices, images, etc. I went with a southwest feel with mine and stuck with colors in my palate: deep red, blue, and cream.

Supplies:
Dowel Rod
Wooden Beads
Leather Cord
Embroidery floss
Fabric
Needle
Yarn
Foil
Hot Glue Gun
We picked up a couple of skeins of yarn in Chama, New Mexico while we were on our way to a campsite last summer. I love the texture and color of the hand spun and dyed yarn.
Sewing the Focal Points:
I enjoy using a non-stretch medium weight denim in a lot of my sewing projects. It tends to hold it's structure well, and I like the way it looks when embroidered. I used a natural denim for this project. My two main sewn focal points are a coyote howling and a snake.
Below are the steps along with a few pictures of an example of the process.
1. On the back side of the fabric sketch your shapes.
2. Cut out the shape.
3. Pin the shape on top of your background fabric.
4. Cut a loose boarder out of the second fabric.

Use a running stitch to go around the boarder of the shape

Once I was half way through stitching the image, I added a filler in-between the layers to give the shape a bit more weight and dimension. I stuffed scrap fabric in my coyote, but for the snake, I used a little foil (from our kitchen) since it was easier to mold and fit into the small crannies of it's shape.
Making the Puff Balls
The size of the puff ball is based upon the distance from the inside of the cardboard circle to the outside. The greater the distance, the longer the pieces of yarn will be and bigger the ball.
Cut out two cardboard patterns
Start wrapping yarn around both cardboard pieces. The more yarn you wrap, the fluffier the puff ball will be.
Cut along the outside edge and hold the yarn in place sandwiched between your fingers.
Run a piece of yarn in-between the two pieces of cardboard and tie a tight knot.
Remove the puff ball from the cardboard.
Done!

I made two puff balls out of blue and cream colored yarn.
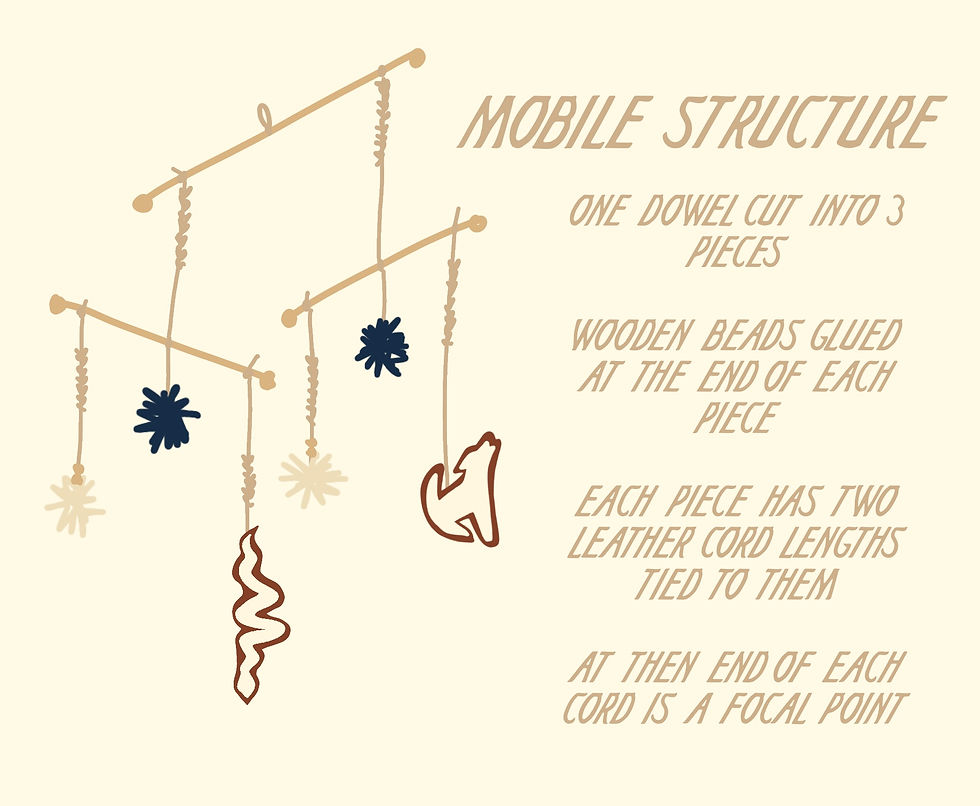
Assembling the Mobile
Now that you got all your focal point dangles ready, it comes down to assembling the structure. The mobile is a pretty simple structure. You can easily add additional dowels for additional focal points as well.
For an added detail I did a chain stitch on the leather cord. You can get a breakdown of tying a chain stitch here.
The main components for construction are the dowel pieces, leather, and beads.
Loosen the knot in the beginning of the chain stitched leather cord and slip it on the dowel.
Hot glue the wooden bead on the end of the dowel. Insert the leather cord into the puff ball until the end sticks out tie a knot to secure it from falling through. You could also use a spot of hot glue here, but I didn't.
Add a very small bit of hot glue to every spot the leather is tied on the dowel to help prevent the leather from slipping.

There you have it! A simple, completely custom little mobile.

Commenti